The title of this post is kind of long and awkward. However, there is no really succinct way to describe this very specific use of the BlueFlyVario_TTL_GPS. I will describe how I have managed to connect the BlueFly to the micro USB port of an Android device running XCSoar. This is not what the TTL_GPS models were designed for, but I get asked about once every few months how they might be connected to an Android device.
Why do this?
Most people that use the BlueFlyVario_TTL_GPS wire it into a Kobo. You can search through a few years of my blog posts to see many examples. Why connect it to an Android device? I think some sailplane guys have Android devices running XCSoar in their cockpits. Not every Android device has a GPS, and I do not know any that has a pressure sensor as good as the BlueFly. In a sailplane cockpit there is enough power and space to run wires and connect them reasonably permanently.
Some things to note
Before you do this please note:
Software Setup
First, download and install MAVCell Beta. You can read about what it was designed for at the link. At the very bottom of the description it says "Also works just for relaying serial data from the OTG port to a TCP address." This is exactly what we want. I found the app pretty easy to configure, although did have to restart a few times as I messed with different configurations. See the image below for the settings which worked for me. Note that after setting the Baud Rate to 57600, ensuring Server Mode is checked, and changing the Server/Client Port to 4353 then you need to 'Open COM Port' then 'Start COM/TCP'.
If you check 'View Feed' then you should see data coming from the BlueFly. This does not look like the pretty ASCII data, instead it is human unreadable Hex data, but don't worry, it works fine by the time it gets to XCSoar. Before proceeding with XCSoar un-check View Feed so you are not using too much CPU.
After that you should be able to see data coming in via TCP via the monitor. Click on 'Manage' and adjust the output mode from 'BlueFlyVario' to 'LX'. That changes the 'outputMode' seting on the BlueFly and asks it to send different data. You can view the monitor to see the LXWP0 and GPS sentences coming from the BlueFly. Now change the Driver from BlueFlyVario to LXNav and all should be well. The only reason we used the BlueFlyVario driver for a short time was to access the 'Manage' menu to change the outputMode.
All going well, your XCSoar should now have data from the BlueFlyVario_TTL_GPS over a wired connection.
Next Steps
With a little testing I found this same procedure worked to get data from the BlueFlyVario_USB_v10. Now this is kind of working I might make a future model of the BlueFly with a FTDI chip based USB connection. Please provide feedback on how this procedure works for you, and what you think you might want in the future.
Why do this?
Most people that use the BlueFlyVario_TTL_GPS wire it into a Kobo. You can search through a few years of my blog posts to see many examples. Why connect it to an Android device? I think some sailplane guys have Android devices running XCSoar in their cockpits. Not every Android device has a GPS, and I do not know any that has a pressure sensor as good as the BlueFly. In a sailplane cockpit there is enough power and space to run wires and connect them reasonably permanently.
Some things to note
Before you do this please note:
- I have not tested this setup in flight and it should be considered experimental. Do lots of testing before you rely on it.
- I still feel the best way to connect to an Android device is by Bluetooth. Despite many issues with Bluetooth it has been more reliable for most people than wired connections. There are a wide variety of usb implementations on Android. While it is reasonably easy to sort something out for one device, it is much less likely that it will be standard across the wide range of past and future devices.
- The Bluetooth model of the BlueFly has a microUSB port, but it is only for charging (there is no data connection).
The XCSoar port
The key to this is working out how to get data coming in via an Android device USB port to be able to be read by XCSoar. There are a few drivers for IOIO, and some pilots are very effectively using it. However, I wanted to be able to read the data from a FTDI based USB to TTL Serial converter. These are the devices I use to connect the BlueFlyVario_TTL_GPS to a PC for debugging, and one of the FTDI chips is used on the BlueFlyVario_USB_v10.
There were a few approaches I considered:
- Messing with the Kernel of a rooted Android device. FTDI describe how to do this, but for me it is kind of an extreme measure and I quickly decided a few years ago to not pursue this idea.
- Adding a 'FTDI' 'port' to XCSoar. From 2013 FTDI provided a Java D2XX driver and package for interfacing with their chips. A new Android app showed off a basic terminal functionality. This opened up all kinds of possibility and we initially though that a FTDI driver for XCSoar was imminent. However, out hopes were quickly dashed when it became clear that the licence provided by FTDI was incompatible with GPL and we could not use the library.
- Create a custom library, make it open source, then use that as the basis for an XCSoar port. The FTDI driver code is not open, but it is all Java and with a little investigation it is possible to understand how it works. It is a lot of work to create a similar driver, and I got busy making varios, so never pursued this.
In the end the approach described in this post relies on a simple workaround. It uses the TCP client port in XCSoar to connect to a bridge. I am not entirely sure why there is a TCP client port in XCSoar, but BlueFly users have made use of it in the past. When some users were having trouble with their Bluetooth stack on old Android devices they could use BlueBridge to connect to their BlueFly, then use XCSoar via TCP to connect to the bridge.
Creating an app that does the same thing with an FTDI port should be pretty easy. An app like the FTDI terminal app would connect to the FTDI device (which in turn would be getting data from the BlueFly), and then the app would serve up that data via TCP. This means there would be no GPL issue with XCSoar, as the bridging app can have whatever licence the developer wanted. After pulling together the necessary code snippets I was about to prepare the FDDI_TCP_Bridge app, but then I decided to search a bit. This was lucky as I saved many hours coding by finding an app which suited out needs perfectly; MAVCell. But first, the hardware.
Hardware Setup
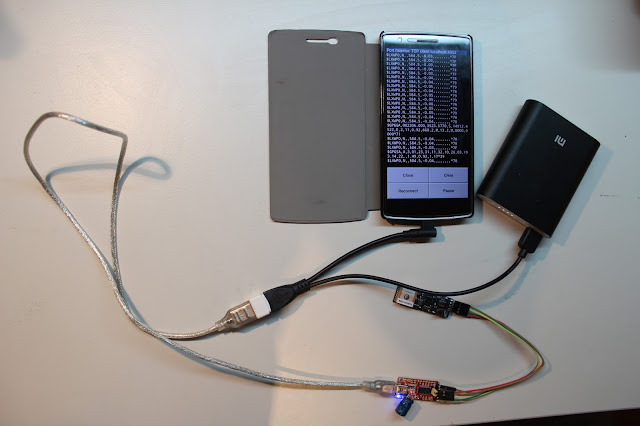
See the image below for the range of connections required. In summary:
- The Android device needs a USB port that works in this configuration. It might or might not work on your device, and unless I have your device on my workbench I will not be able to tell you.
- An appropriate USB OTG Y cable that will allow you to power the BlueFly, and allow it's data to go to the Android device. I used this one.
- A power supply (that is the battery pack on the right).
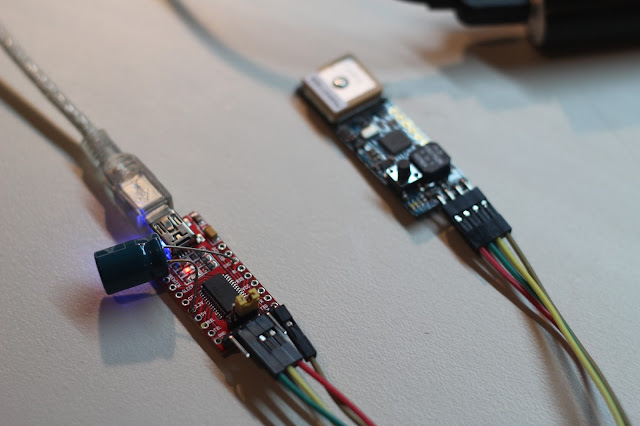
- A USB to TTL serial converter with an FTDI chip. I used this one. Note that I modified the converter I had with a 470uF electrolytic capacitor on the 3.3V output from the chip (you can see that in the image below the image below). The FTDI chip on my converter only provides 50mA at 3.3V and when the BlueFly beeps it spikes above that, which reduces the voltage a little, which then sensing a false pressure drop, which then creates a feedback loop by beeping again as the vario thinks it is in lift. The capacitor stores just enough energy to keep the voltage steady during beeps. I did not think too hard about the value, it just happened to be one which was lying around and it worked.
- A BlueFlyVario_TTL_GPS.
- Cables for to connect things as pictured.
After you have connected everything proceed to Software Setup.
Software Setup
First, download and install MAVCell Beta. You can read about what it was designed for at the link. At the very bottom of the description it says "Also works just for relaying serial data from the OTG port to a TCP address." This is exactly what we want. I found the app pretty easy to configure, although did have to restart a few times as I messed with different configurations. See the image below for the settings which worked for me. Note that after setting the Baud Rate to 57600, ensuring Server Mode is checked, and changing the Server/Client Port to 4353 then you need to 'Open COM Port' then 'Start COM/TCP'.
If you check 'View Feed' then you should see data coming from the BlueFly. This does not look like the pretty ASCII data, instead it is human unreadable Hex data, but don't worry, it works fine by the time it gets to XCSoar. Before proceeding with XCSoar un-check View Feed so you are not using too much CPU.
In the XCSoar devices menu select the 'TCP' client port then adjust the settings as shown below (although use the BlueFlyVario driver to start with, not the LXNAV driver).
After that you should be able to see data coming in via TCP via the monitor. Click on 'Manage' and adjust the output mode from 'BlueFlyVario' to 'LX'. That changes the 'outputMode' seting on the BlueFly and asks it to send different data. You can view the monitor to see the LXWP0 and GPS sentences coming from the BlueFly. Now change the Driver from BlueFlyVario to LXNav and all should be well. The only reason we used the BlueFlyVario driver for a short time was to access the 'Manage' menu to change the outputMode.
All going well, your XCSoar should now have data from the BlueFlyVario_TTL_GPS over a wired connection.
Next Steps
With a little testing I found this same procedure worked to get data from the BlueFlyVario_USB_v10. Now this is kind of working I might make a future model of the BlueFly with a FTDI chip based USB connection. Please provide feedback on how this procedure works for you, and what you think you might want in the future.


