The most recent firmware provides more stability and fixes small bugs. The firmware files are here:
- v23 Models:
- Bluetooth - BTH_USB_23.1.474.hex
- Bluetooth_GPS_IGC - BTH_GPS_IGC_23.1.574.hex
- v22 Models:
- Bluetooth - BTH_USB_22.2.474.hex
- Bluetooth_GPS_IGC - BTH_GPS_IGC_22.2.574.hex
- TTL_GPS - TTL_GPS_22.2.275.hex
- USB_TTL_GPS_IGC - USB_TTL_GPS_IGC_22.2.675.hex
If you look in the folder here here and order by last modified you might find more recent versions of the firmware.
Firmware update procedures for Bluetooth models
This is the same as the procedure as described in earlier blog posts, but hopefully it is a bit more clear.
First, you will need a computer which can run windows applications and a USB-A to USB-C cable. You will also need the ds30StudioPro program and the latest BFVDesktop application. Get them here:
Step 1: Make sure you have your power and connections right
First, you will need a computer which can run windows applications and a USB-A to USB-C cable. You will also need the ds30StudioPro program and the latest BFVDesktop application. Get them here:
- https://www.blueflyvario.com/files/v22/ds30StudioPro.exe
- https://www.blueflyvario.com/files/BFVDesktop0.87.zip
Both of these tools need additional software on your PC to work properly (BFVDesktop needs java, and ds30StudioPro needs .NET framework).
The ds30 bootloader on the Bluefly communicates through the UART1 port of the onboard processor, which is connected to the physical USB port of the Bluefly. So first, we are going to make sure that this is working.
Step 3: Testing and Settings
- Plug the Bluefly into your computer with a USB cable and make sure to note which COM port is listed in your windows device manager. If this is the first time you have done this it might install the FTDI driver automatically. If not, you might need to install it manually by using the setup executable for the virtual com port driver here.
- Open the BFVDesktop application. Select the COM port the Bluefly is installed as. Then press Connect. Then start the Bluefly. You should see data streaming in from the Bluefly
- Shutdown the Bluefly by long pressing the clear button. Leave it connected via the USB port.
- Ensure that you shutdown the BFVDesktop application before trying to update the firmware - only one application on your computer can connect to the Bluefly at a time.
Step 2: Loading the firmware
- Note that this will overwrite any hardware settings on the Bluefly and they will be reset to defaults.
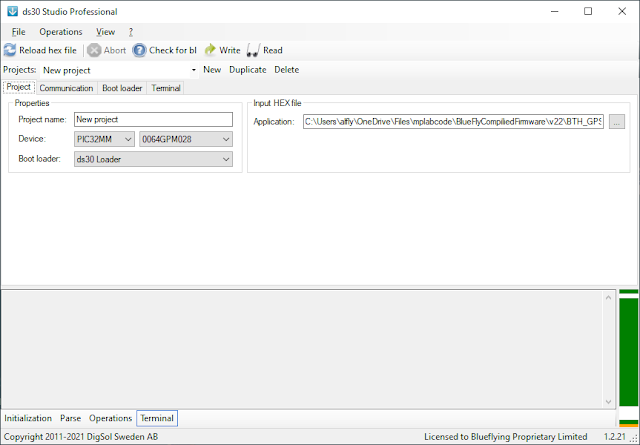
- Open ds30StudioPro. You might need to click 'New' to create a new project. On the Project tab: Select the Device and Bootloader as shown below. Select the Input HEX file application to the firmware *.hex file you have saved on your computer for the model you are updating.
- On the Communication tab: Set the port to the one which you know from step 1 communicates with the Bluefly, and the baud rate is set at 115200.
- On the Bootloader tab: Make sure the Write Destination checked as the main flash and not the boot flash.

- Before pressing the Write button the Bluefly must be shut down (from the last point in Step 1)
- Press the Write button.
- This will start the ds30StudioPro looking for the bootloader on the vario. (If the BFVDesktop application is still running and connected to the then you will get an error as the COM port will be busy)
- After a few seconds, press the button on the Bluefly to start it.
- If everything works then the Bluefly green light will come on and the Bluefly will communicate with the ds30StudioPro application (instead of starting normally), the firmware will start writing, and you will have new firmware in the vario in under a minute. You can see the write process with a green bar at the top of the ds30StudioPro application.
- You might get a communications error because there are some buffers that need flushing in the UART communication pipeline - if so, then shut down the vario and try again and go back to the step where you press the write button. You might need to try this a few times, including unplugging and re-plugging the USB cable into the Bluefly.
- When the writing is finished the Bluefly should restart within about 10 seconds after some green light flashing.
Step 3: Testing and Settings
- Before you disconnect everything, open up the BFVDesktop application and connect to the Bluefly again.
- Look at the firmware version by shutting down and restarting the Bluefly and seeing if the new firmware is on the device
- Test two way communications by sending some commands or adjusting some settings.
- If you have the IGC model, you might want to press the IGC button and format the IGC memory.
Firmware updated procedures for TTL models
Follow the firmware update procedures described in this earlier blog post.
Follow the firmware update procedures described in this earlier blog post.